Category Archives: instructions

Whipped Cream

Note: If this is your first time to TotalFluff, please visit this brief explanation. Thanks!

Hello again, Fluffsters! I hope you’re having a good week. I’m having an excellent one so far. It’s being busy, exhausting, and very tiring, but it’s also being a lot of fun.

I was realizing, however, that I need some more varied “traditional fluff” on this page.

No. You really don’t.

Yes, actually, I really do.

That is why today I am going to talk about:

Things About Whipped Cream.

1) It qualifies as fluff. Even the densest whipped cream is smooth and airy. (If it isn’t, it doesn’t qualify.) It is, in fact, part of the definition of whipped cream.

What? It’s part of the definition?

Yes. I originally thought I’d need to make up the definition to match, but it turns out I don’t. It really is part of the definition!

2) It goes great with any type of summer fruit. Peaches, blueberries, strawberries…. The list could go on, but you get the picture I’m sure.

3) It goes well with other dairy products. Ice cream sundaes, for example, are amazing. Ice cream, whipped cream, and chocolate sauce. Yum. Banana splits with whipped cream are also phenomenal.

4) Whipped cream can be easy to make. All you really need is a blender. (preferably one with a seal-able lid.) Put whipping cream into the blender, sweeten to taste, and whip it until it turns light and fluffy.

5) There are a few interesting variations. My Dad, for example, always puts vanilla into his. That stuff is amazing. It’s almost like ice cream, but not quite. And that’s only in part because it’s not frozen. Other variations of his that are interesting, and can be really good, involve putting other flavors in. I don’t remember whether we’ve tried one with peppermint extract or not, but that would also be pretty amazing.

Other variations, of course, include the “industrial” kind that sometimes don’t even have real cream in them. (Koolwhip, I’m looking at you…) These do have their place, but they aren’t real whipped cream if they don’t have cream. Sometimes store bought whipped cream can be good, though.

And so, Fluffsters, whatever your take is on whipped cream, I hope you enjoy. Happy Wednesday!

How to: Write July 23’s Fluff Post

Note: If this is your first time to TotalFluff, please visit this brief explanation. Thanks!

Gee, not thinking of any particular ideas for your Fluff Posts, Webmaster?

…Maybe.

But just tonight’s. Until inspiration hit. (Spoiler alert.) Because, you see, I realized what I could write abou- Oops. more spoilers. Sorry.

I should probably just start the post.

If it even qualifies as a post…

Hey! Of course it does! But that’s another digression. So, without further ado:

Instructions for writing the fluff post for July 23, 2013

1) Look at the clock. Realize that it’s only 9:00pm on the 22nd. (12:00am on the 23rd Fluff Time.) You’ve got plenty of time to start spinning some yarn/thread/stuff before you need to start writing a fluff post! It’s a whole nine hours before it needs to be up and ready!

2) Lose track of time while wasting time. Look up at the clock again at about 11:00pm. Realize you’ve still got a bit of time before you were planning on going to bed.

3) Make some tea, and start thinking about the Fluff Topic. I would go with coffee, but that takes work. These days, for writing stuff, I’m going with Tea, Earl Grey, Hot. (I’ve always wanted to say that! Yay!)

You and your life goals…

Huh, yeah! I have just achieved a life goal! That’s fun!

But back to the list.

3b) “brainstorm”. Otherwise known as look around the internet, wander your current location aimlessly, and maybe read a book. All to get “inspired”, of course.

By this time, it’s a bit after midnight. You meant to go to bed about 15 minutes ago. Woops. Time to start thinking in earnest…

4) Focus. Fabric. Fabric is a good option- it’s fluffy, right?. Go to fabric.com to drool over all the fabrics available online that you can’t afford yet. Well, that you might be able to afford, but realize that you just bought about 5-10 yards of fabric recently that you haven’t started to use yet, and realize that you really shouldn’t get any more fabric. Even if it’s penguin printed fabric. More to the point, penguin printed fabric that would match your penguin socks perfectly.

I wonder if I could justify making a skirt out of this? Do I have any shirts that would work? Is it bad form to use flannels like that for adult(ish) apparel! Can I justify buying any of the fabric? Can I even afford how much it would take? ($13 a yard? No thanks!)

And I’m digressing again.

4b) Realize you can’t use fabric.com exclusively for your fluff post. Especially if you haven’t actually ordered anything from there (which I personally haven’t.) Besides, there’ve been enough posts on this blog about other websites already.

5) Stare at your messy counters. Realize that you’ve already written a post about how to messify any surface in just a few simple steps… there goes that stroke of inspiration.

6) Realize that you just passed your 175th blog post, so can’t even write about that. (Yay Fluff, though! Over 175 posts, and almost 6 months of daily blogging! Woohoo!)

7) Realize that what doesn’t kill you gives you stories. (Ooh, I should make a cafepress design out of that! I’ll let you know if I do.)

8) Enter Inspiration: Decide to write about writing a fluff post. The day is saved! And it’s only 12:30 am- still only about a half hour after “the latest I’m going to bed tonight, period.” (Hah!)

9) Get sidetracked by a conversation with Fluffy about what this post is going to be about. And give spoilers. You can’t forget the spoilers.

10) Start writing. Get up to point ten (Hey, look at that!) and wonder whether you should include pictures in your post.

11) Decide yes, and then decide to ignore that decision. And the sudden itch in your fingers to pick up a pen and try to figure out how to illustrate this post.

12) Realize that it’s almost 1:00am, and that you can always update the post later.

13) finish the post, have the final conversation with Fluffy (if it happens), double check everything, realize that you’re linking to this post in this post, yadda yadda, schedule for the post to go up at 9:00am on July 23rd, decide that you’ve gotten too little sleep and should therefore go to bed, follow through on that decision, and get ready for bed. And hopefully end up actually getting some sleep. (This hasn’t happened yet as I’m writing. It will hopefully have happened by the time you’re reading. Because time is weird like that, and so are blogs and stuff.)

So there you go, Fluffsters! That’s how to write today’s post in 13 circuitous steps. Happy Tuesday!

Wait, what about the final conversation with me? It didn’t happen!

You mean the one we’re having now?

…Oh. Yes.

I think it sort of slipped my mind.

Anyways, as I was saying, happy Tuesday! I hope you have a fantastic week!

bonus: 14) Waffles) Realize that somewhere in there you took a screencap of how this post is the 1337-est post yet. Insert that picture, and an ambiguous timeframe. Is this supposed to have happened before or after I go to bed?

the 1337est post Fluff has had!

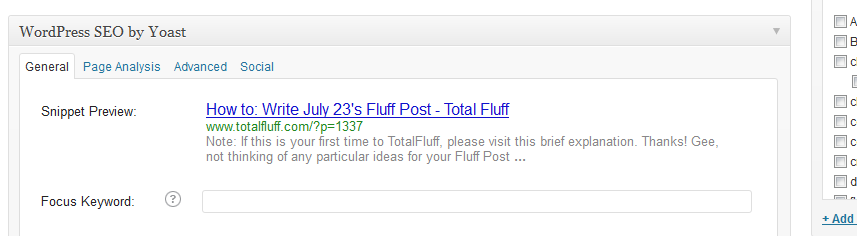
The Leetest post yet!

blue) Change what had been 14 above to waffles. Ambiguous times in lists and instructions are even more confusing when you have numbered lists. So ignore the numbers, and change it to something nonsensical. Return to the rest of 14 as usual.

So, once again: Happy Tuesday!

**update** Disclaimer: Results may vary, based on word choice. Simply following these directions does not guarantee that an identical post might easily be written.

DIY Housewarming Card

Note: If this is your first time to TotalFluff, please visit this brief explanation. Thanks!

Hello, Fluffsters! Remember how a bit over a week ago I ruined a pair of pants doing a craft project, and I said I’d share photos with you in a while, because it was a gift for someone?

Well, today’s your lucky day, because I’m about to share the photos with you!

“Your lucky day”? Really, Webmaster? Do you try to come across as arrogant, or does it come naturally to you?

…Says the know-it-all in the computer…

But I digress.

DIY Housewarming Card

So, here’s the end result:

Closeup of the Housewarming Card: Sideways view

Housewarming Card Sideways view closeup

A fuller view of the house warming card

Full view of the Housewarming Card

I didn’t do a professional looking message, but I did write a personal one. So I don’t have a picture of the inside. But really, it’s nothing very special.

Here are the instructions for how to make it.

1) Find a light-colored piece of cardstock and a brown piece of cardstock. I chose white and dark brown. Clearly. The white is the main color, the brown is the roof and door color.

2) Cut them in half vertically. Keep one piece of each color. You won’t need the other scraps.

3) Fold in half. The end result is that you have a card that’s about a quarter of a page in area. Half of the length by half of the width. Basically, this is to make it fit in a greeting-card-sized envelope. (Normally they’re called “invitation envelopes”, I think.)

4) On the white cardstock, trace a house shape. Note where your fold is. The way I did my house was I kept the fold to the left of the “floor”. So in the bottom right hand corner, I traced a rectangle. Or a semi-rectangle. If the angles are not perfect right-angles, it adds a cute, quirky look to the card.  For the roof, start at the corner where your rectangle left off. Figure out what angle you want your roof to have. Trace that angle. Note what your angle is, and draw a similar angle down. Note: Do this on the “right” side of your white cardstock. If you want to add a chimney, find a location on your slanted roof. Trace a small semi-rectangle.

5) Cut out the shapes. Hold both pieces of cardstock together, and cut. In this instance, you probably want the brown on the inside so that you can see the traces. Be sure to keep your pieces of cardstock folded! Note: I didn’t do this, but you could cut the brown cardstock in half, on the fold, before your cut out the shapes. That might make it a bit easier in future steps.

6) Shape the brown cardstock. Find the bottom of the roof. I scallop-cut across where the bottom of the roof was. From the remaining cardstock, you can cut a thin(ish) rectangle to be your door. Looking at the dimensions, I think it was probably about a 1×2 inch rectangle. Start off with a bit bigger than that, and trim it down to an appropriate size. Also, cut out 4 thin strips of cardstock to make windows with.

7) Glue. First, you want to glue the brown of the roof to the top of the white card. Try to make it line up. After all, you cut them to exactly the same dimensions… So it should work, right? Then you probably want to glue the door. Find where it looks reasonable, and glue it down. This is your card, so you have flexibility here! You can look at the pictures of mine for a reference, if you wish. After you get the door done, you’re going to do the window. Ok, so I’m going to suggest you do it differently from how I did it here. I recommend spreading glue in a rectangle, and then pressing the little strips of cardstock you made onto the glue. What I did was I glued down the cardstock, each piece with its own glue squirt. I realize now that it wasn’t the best of all possible ideas… If you do go with my original way, you will then want to spread a thin layer of glue on the inside. When the glue dries, it leaves a shiny appearance. This will give your “window” a slight “glass” effect. If any of you are artistic, or if you know what the inside of your friend’s house will look like, you could probably past a picture of their house behind the “window.” That could actually be really cute! Let me know if you do that?

Anyways.

8) Paint / decorations. I happened to have a bit of gold paint on hand. I took a very fine tipped brush and painted a doorknob onto the door, in addition to the location’s street number there at the top. At some point in there I also ended up sketching “shingles” onto the roof. That’s totally optional. I’m not sure I like how that part came out, but it was probably worse just having straight brown. So all in all, I think it was the better move.

Happy Sunday, Fluffsters! Have fun! If you do end up making a card like this, do let me know! (I’d also love to see pictures.)

DIY Flower Hair Wreath

Note: If this is your first time to TotalFluff, please visit this brief explanation. Thanks!

Hello, Fluffsters!

In case you hadn’t picked up on this by now, I enjoy arts and crafts. Tonight I made a flower wreath for my hair. (Out of fake flowers, so I’ll be able to use it for an upcoming event.)

It’s not entirely finished yet, but it’s close! (I need to trim some ends, and decide whether or not to add glittery stuff. It’s going to be for a semi-earth-fairy-ish costume, so I’m potentially going to sparklify it. Regardless, I needed a flower circlet for the character, so I decided to try to DIY a flower wreath. 🙂 )

First, I went to Michaels and looked for some mini rosettes. The original plan had  been to braid some of those lovely wire-stemmed miniature rosettes into a wreath. That didn’t happen, due to lack of rosettes I was looking for. So I improvised.

I instead went with these flowers:

purple and white fake flowers to be turned into a DIY hair wreath

Purple & White fake flowers

Fortunately for me, they were on a good sale, so I got them for a decent price. I actually took that picture after removing a number of the flowers (with stems) for the wreath. But that’s getting ahead of myself…

So as I was saying. I got those flowers. And then I used some wire cutters to cut individual strands as long as I could. I removed leaves and extra bunches that were at extreme angles.

I then laid about three stalks together, and somewhat braided them. The stems were not that malleable, so I used some ribbon (and later some long synthetic leaves from the white bunch of flowers) to tie the stalks together. When I got towards the end of a bunch, I put the next set on. And kept tying.

As I was doing this, I measured the wreath around my head to make sure it would fit. (That had the added bonus of building the curve into the wreath.) As I tied and measured, I did bend the stems into the proper form. They can hold the more gradual curve; they’re just not good for braiding.

When it got long enough, I tied the beginning to the end.

Here’s what I have of the wreath so far:

DIY flower hair-circlet top view

Top view of my hair flower wreath

Front view:

front view of the DIY hair circlet of synthetic flower

Front view of my flower circlet

I’m fairly happy with how it turned out. 🙂

How about you, Fluffsters? Have you created anything interesting lately?

Make a Room Messy in 7 Easy Steps

Note: If this is your first time to TotalFluff, please visit this brief explanation. Thanks!

Greetings, Fluffsters! Happy Friday! (Weekend, yes!)

First of all, I just wanted to remind you quickly that today’s the last day to get a “You Look Comfortable. Let me change that” with a penguin on it merchandise at the current price. I’ll be adding something new to the New and Now section tomorrow, and moving those to the normal priced part of the store. So you should check it out!

Second, today’s post!

I’ve been thinking. There are a few things that I am really good at-

Because that’s not arrogant…

-and I’m going to give instructions for how to do one of those things. Specifically

How to make a room messy in 7 easy steps.

…what?

Yup! One of my skills is making things messy. It comes naturally to me, and I’m good at it.

1) Pick a room. This is an important step. Don’t skimp on this step. If this is your first time messy-ing a room, go with a smaller room. You probably want only one clutter-y surface.

2) Measure the open space. You don’t have to actually measure with a measuring tape or anything like that. Measuring it by eye also works.

3) Guesstimate how many items you’ll need.

4) Add 4. That’s how many items you’ll probably end up using.

5) Start doing something that requires *something*. This could be reading, it could be using your computer, or anything. The easiest is to do a craft.

6) Do not put your supplies away. Instead, place it tastefully, even artfully, on your open surface.

7) Repeat steps 1-6. When you have what looks like enough items to qualify as a “mess”, repeat once more. Just for good measure.

And that, fluffsters, is one method to make a room messy. Have fun!