Category Archives: crafts and projects

Spinning Yarns!

Note: If this is your first time to TotalFluff, please visit this brief explanation. Thanks!

So, I’m ridiculously happy. I got my drop spindle today!

As in for spinning thread and yarn?

…yes? What other kind of drop spindle do you know of?

I don’t, which is why I was clarifying.

Huh?

I hoped there would be some logical explanation for why you’re happy.

Because I’ll be able to start trying to spin yarn.

Oh, right. It’s a bit less common on your world to do that, isn’t it?

I don’t know. It’s certainly not overly common.

If I had to spin in my new home, I’d be jealous of that. As it is, however, I’m not. I needed to spin back on my world, but I don’t here.

I guess the novelty of it does count for a lot.

But anyways, I made a very bad, very short length of yarn tonight! And I’m very happy. After all, I’ll only be able to improve, right?

Very lumpy uneven first spun thread/yarn

My first spun yarn/thread/thing! I can only get better, right?

Well, I don’t think you can get any worse.

…Uh, yeah. Well, it was my first one. And I’m using a video tutorial. So yeah, it’s bad. But I’m still very happy with it!

I have a hope of being able to crochet my own hat from hand-spun yarn one of these days. Preferably soon. But more likely, before I die. You know, set your goals low, and then you can meet them!

That’s one way of looking at it, I suppose.

Yup! Anyways, Happy Sunday, Fluffsters! I hope you have an excellent week.

DIY Housewarming Card

Note: If this is your first time to TotalFluff, please visit this brief explanation. Thanks!

Hello, Fluffsters! Remember how a bit over a week ago I ruined a pair of pants doing a craft project, and I said I’d share photos with you in a while, because it was a gift for someone?

Well, today’s your lucky day, because I’m about to share the photos with you!

“Your lucky day”? Really, Webmaster? Do you try to come across as arrogant, or does it come naturally to you?

…Says the know-it-all in the computer…

But I digress.

DIY Housewarming Card

So, here’s the end result:

Closeup of the Housewarming Card: Sideways view

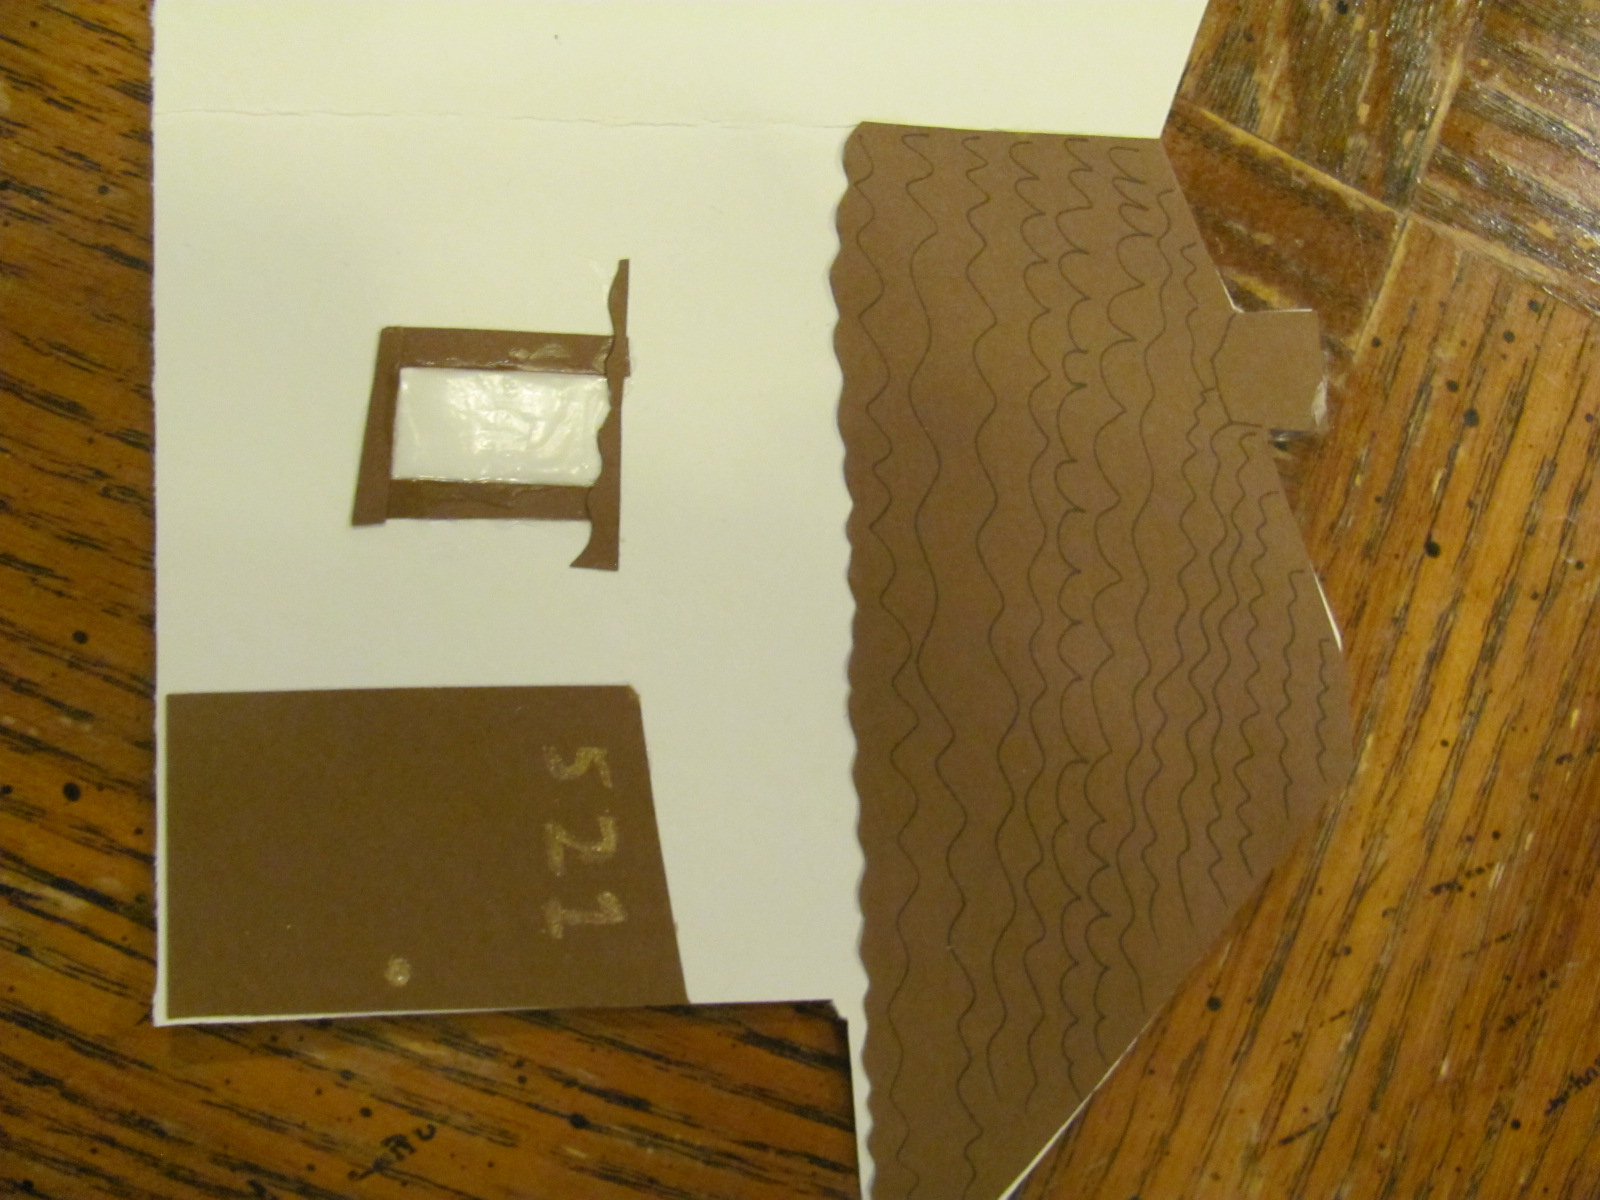
Housewarming Card Sideways view closeup

A fuller view of the house warming card

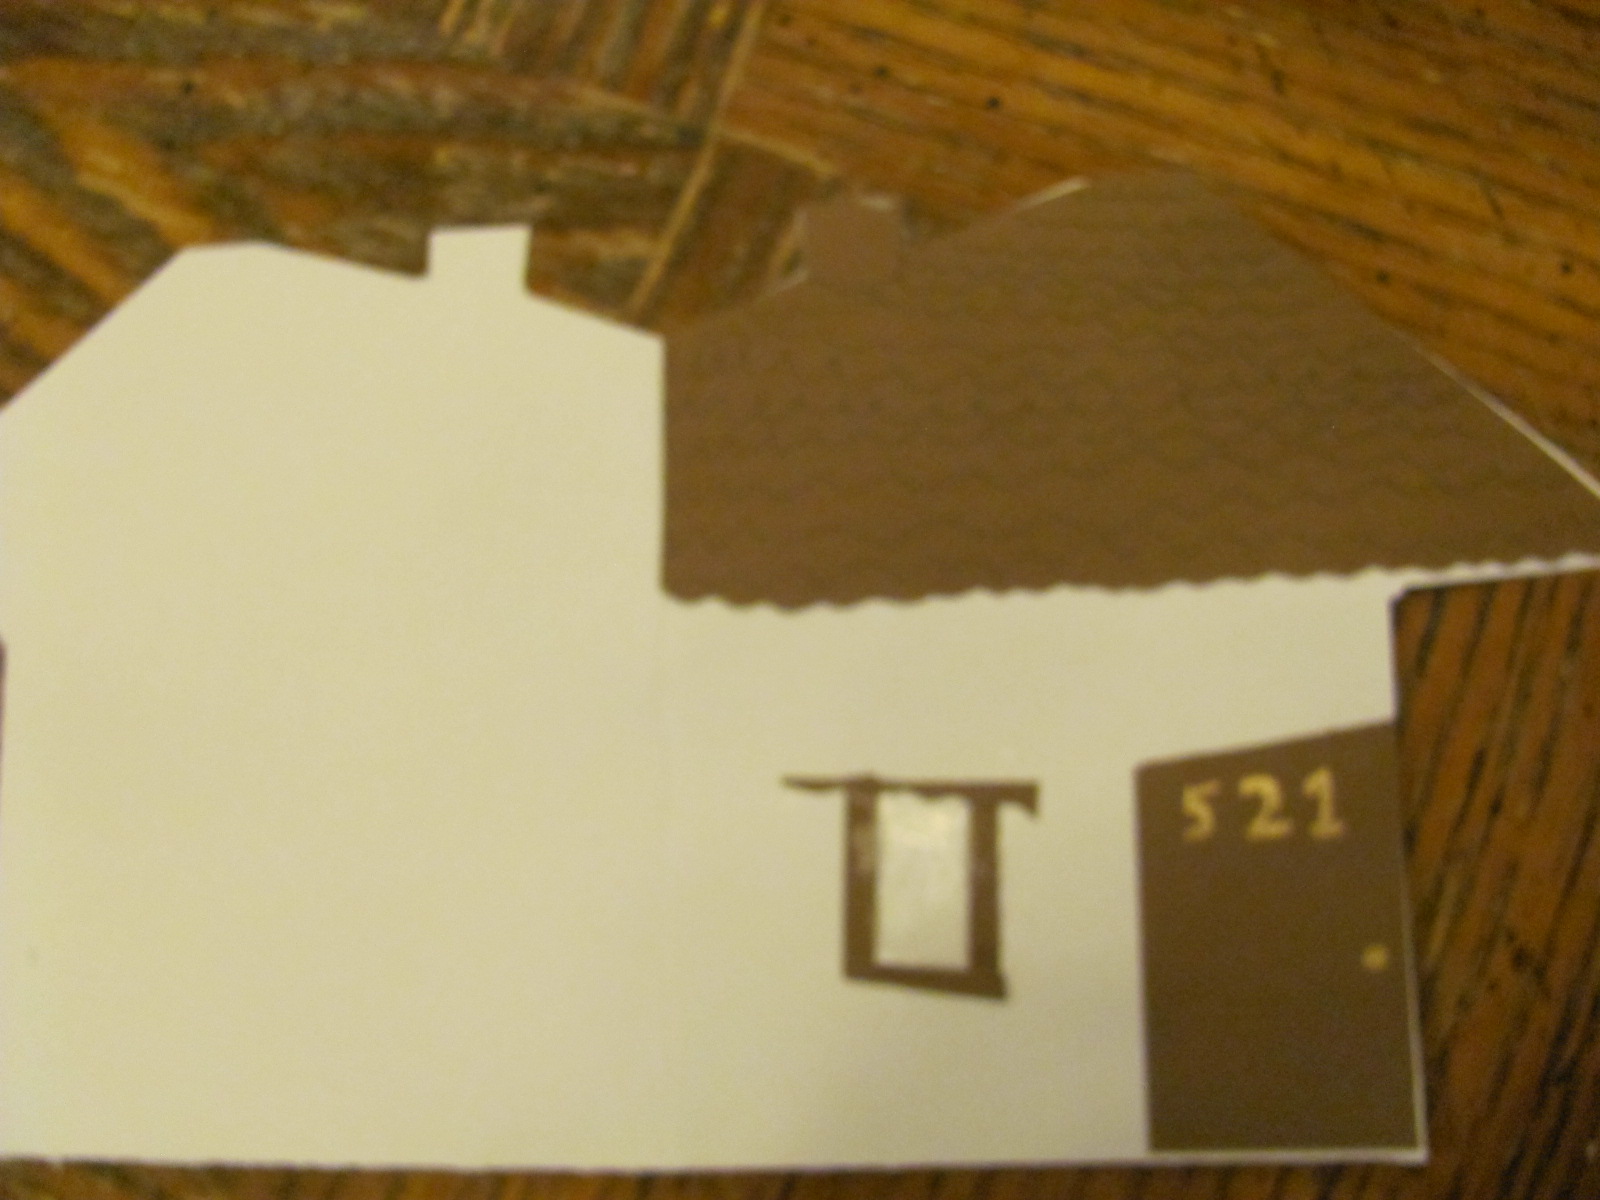
Full view of the Housewarming Card

I didn’t do a professional looking message, but I did write a personal one. So I don’t have a picture of the inside. But really, it’s nothing very special.

Here are the instructions for how to make it.

1) Find a light-colored piece of cardstock and a brown piece of cardstock. I chose white and dark brown. Clearly. The white is the main color, the brown is the roof and door color.

2) Cut them in half vertically. Keep one piece of each color. You won’t need the other scraps.

3) Fold in half. The end result is that you have a card that’s about a quarter of a page in area. Half of the length by half of the width. Basically, this is to make it fit in a greeting-card-sized envelope. (Normally they’re called “invitation envelopes”, I think.)

4) On the white cardstock, trace a house shape. Note where your fold is. The way I did my house was I kept the fold to the left of the “floor”. So in the bottom right hand corner, I traced a rectangle. Or a semi-rectangle. If the angles are not perfect right-angles, it adds a cute, quirky look to the card.  For the roof, start at the corner where your rectangle left off. Figure out what angle you want your roof to have. Trace that angle. Note what your angle is, and draw a similar angle down. Note: Do this on the “right” side of your white cardstock. If you want to add a chimney, find a location on your slanted roof. Trace a small semi-rectangle.

5) Cut out the shapes. Hold both pieces of cardstock together, and cut. In this instance, you probably want the brown on the inside so that you can see the traces. Be sure to keep your pieces of cardstock folded! Note: I didn’t do this, but you could cut the brown cardstock in half, on the fold, before your cut out the shapes. That might make it a bit easier in future steps.

6) Shape the brown cardstock. Find the bottom of the roof. I scallop-cut across where the bottom of the roof was. From the remaining cardstock, you can cut a thin(ish) rectangle to be your door. Looking at the dimensions, I think it was probably about a 1×2 inch rectangle. Start off with a bit bigger than that, and trim it down to an appropriate size. Also, cut out 4 thin strips of cardstock to make windows with.

7) Glue. First, you want to glue the brown of the roof to the top of the white card. Try to make it line up. After all, you cut them to exactly the same dimensions… So it should work, right? Then you probably want to glue the door. Find where it looks reasonable, and glue it down. This is your card, so you have flexibility here! You can look at the pictures of mine for a reference, if you wish. After you get the door done, you’re going to do the window. Ok, so I’m going to suggest you do it differently from how I did it here. I recommend spreading glue in a rectangle, and then pressing the little strips of cardstock you made onto the glue. What I did was I glued down the cardstock, each piece with its own glue squirt. I realize now that it wasn’t the best of all possible ideas… If you do go with my original way, you will then want to spread a thin layer of glue on the inside. When the glue dries, it leaves a shiny appearance. This will give your “window” a slight “glass” effect. If any of you are artistic, or if you know what the inside of your friend’s house will look like, you could probably past a picture of their house behind the “window.” That could actually be really cute! Let me know if you do that?

Anyways.

8) Paint / decorations. I happened to have a bit of gold paint on hand. I took a very fine tipped brush and painted a doorknob onto the door, in addition to the location’s street number there at the top. At some point in there I also ended up sketching “shingles” onto the roof. That’s totally optional. I’m not sure I like how that part came out, but it was probably worse just having straight brown. So all in all, I think it was the better move.

Happy Sunday, Fluffsters! Have fun! If you do end up making a card like this, do let me know! (I’d also love to see pictures.)

Sometimes residential colleges are a pill.

Note: If this is your first time to TotalFluff, please visit this brief explanation. Thanks!

Sometimes, living in the college dorms can be a real nuisance. Most of the time not, but sometimes…

If you’re going to expand on that, you’re going to have to do so on you own. I am not asking you if you’d care to elaborate.

Ooh, “Care to elaborate”? Yes, I would care to elaborate!

Hey, that’s no fair! You changed my punctuation!

Ah, but I didn’t quote your punctuation. That means that it’s ok. So yes, I will elaborate. In fact, this elaboration will also help with one of the mission statements of the website!

We have official mission statements? When did that happen?

Well, not official mission statements. But it’s on the front page. This explanation will help our valued Fluffsters procrastinate!

Ah, by making them read through all of your topic-changes before getting to the end of the post? I thought I did that anyways.

You’re sidetracking me on purp- Wait, no. I’m not falling for that this time.

Falling for wha-

No.

I am going to explain to you about

A craft that looks epic but that I can’t do thanks to dormitory restrictions.

Ha.

Darn. There went that tactic.

So, I recently came across a fantastic craft tutorial for making hand-decorated candles. Basically, you take some white tissue paper, draw on it with markers, melt it into the candle, and voila! Instant decorated candle.

But alas, lamps with shades, coffee-pots with open burners, fabric in front of windows, candles, and pretty much any other form of flammable material or things that can start fires (except for cigarette lighters) are strictly forbidden at my school.

…But cigarette lighters are allowed?

I think so. You know, I haven’t actually checked on the flint-and-steel regulations recently…

But candles, as I was saying, are very strictly forbidden. That means that I cannot use any candle that I would consider decorating in such a fashion. Alas, such is the tragedy of dorm life.

Such a hard life you lead.

Alas, indeed. Woe is me, alas, and alack!

Wait, did you just switch roles on me? I thought I was supposed to be the overly dramatic one here!

I think the difference is that when you do it, you’re acting.

That’s a scary good point.

Well, Fluffsters, happy Monday! I hope that tutorial helps you procrastinate a bit.

DIY Letter Holder in a Book

Note: If this is your first time to TotalFluff, please visit this brief explanation. Thanks!

It. Always. Happens.

Please. Don’t tell me. I’ll be happier not knowing, I’m guessing.

No wait, let me guess: Your stalker rainbow appeared again?

Ha ha, very funny. No, that’s not it. It’s actually relatively simple this time.

You see, I journal. Every night, for the past 2 and a half years or so! And frequently (but not regularly) for the year and a half before that. But I digress.

Good, inexpensive journals are limited. I really like ones that have card and letter holders in the back, just on the off-chance somebody will send me something. (I’m a bit of a pack-rat when it comes to things like letters. And things from people.) So the journal that I used up most recently had one in the back, and nobody sent me something worth keeping during that time.

And this current journal? It’s lovely. I really like it! But it doesn’t have a card-holder in the back. So, naturally, this is when people start mailing me things. Now don’t get me wrong, I love mail! I’m thrilled at the mail! I’m annoyed at the journal.

So I decided to add a letter-holder.

DIY Book Cover Letter Holder

What I did was I found a piece of cardstock that was a suitable color. I then folded the two shorter sides to have a double fold. (It makes a zig-zag; the edge points in.) I then glued it to the inside back cover. It’s not the tidiest I’ve ever made, but it should be functional. And if not, I’ll probably be able to take it out and start over.

cardstock book-cover letter-holder

Top of the letter holder

The DIY book-flap letter holder opens

Front of the holder. See how it opens?

One thing of note: if you can cut at a bit of an angle, that would probably be better. You want the most “height” (so the most folded-under-ness) to be at the part where you open it. So, you glue down the two shorter sides and one of the longer sides. You make sure that the other larger side has extra fold-space, so that it can open further.

If you have any questions, let me know! Happy Thursday, everyone!

DIY Flower Hair Wreath

Note: If this is your first time to TotalFluff, please visit this brief explanation. Thanks!

Hello, Fluffsters!

In case you hadn’t picked up on this by now, I enjoy arts and crafts. Tonight I made a flower wreath for my hair. (Out of fake flowers, so I’ll be able to use it for an upcoming event.)

It’s not entirely finished yet, but it’s close! (I need to trim some ends, and decide whether or not to add glittery stuff. It’s going to be for a semi-earth-fairy-ish costume, so I’m potentially going to sparklify it. Regardless, I needed a flower circlet for the character, so I decided to try to DIY a flower wreath. 🙂 )

First, I went to Michaels and looked for some mini rosettes. The original plan had  been to braid some of those lovely wire-stemmed miniature rosettes into a wreath. That didn’t happen, due to lack of rosettes I was looking for. So I improvised.

I instead went with these flowers:

purple and white fake flowers to be turned into a DIY hair wreath

Purple & White fake flowers

Fortunately for me, they were on a good sale, so I got them for a decent price. I actually took that picture after removing a number of the flowers (with stems) for the wreath. But that’s getting ahead of myself…

So as I was saying. I got those flowers. And then I used some wire cutters to cut individual strands as long as I could. I removed leaves and extra bunches that were at extreme angles.

I then laid about three stalks together, and somewhat braided them. The stems were not that malleable, so I used some ribbon (and later some long synthetic leaves from the white bunch of flowers) to tie the stalks together. When I got towards the end of a bunch, I put the next set on. And kept tying.

As I was doing this, I measured the wreath around my head to make sure it would fit. (That had the added bonus of building the curve into the wreath.) As I tied and measured, I did bend the stems into the proper form. They can hold the more gradual curve; they’re just not good for braiding.

When it got long enough, I tied the beginning to the end.

Here’s what I have of the wreath so far:

DIY flower hair-circlet top view

Top view of my hair flower wreath

Front view:

front view of the DIY hair circlet of synthetic flower

Front view of my flower circlet

I’m fairly happy with how it turned out. 🙂

How about you, Fluffsters? Have you created anything interesting lately?

Finished Hippocampus Statuette

Note: If this is your first time to TotalFluff, please visit this brief explanation. Thanks!

Hello, Fluffsters! Happy Thursday! (Almost the weekend. Yes!)

As I’m sure you remember from yesterday, I’ve been working on a polymer-clay project. Well, I painted it last night, so I think it’s finished!

mottled hippocampus polymer clay statuette

Front view of the hippocampus statuette

Side view of the polymer clay horse-fishey statuette I made

Side view of the polymer clay horse-fishey statuette I made

I hope you enjoy! I’d love to hear any feedback you have.

Meanwhile, I hope you have a wonderful rest of your week!

Inspiration in Myth

Note: If this is your first time to TotalFluff, please visit this brief explanation. Thanks!

Blast it, Fluffy, I spent all day yesterday, and I couldn’t find what you changed! WHAT DID YOU CHANGE?

Now, Webmaster, be reasonable. Did I ever actually say that I changed anything?

You mean y-you, why I ought to-

Yeah. No. That was just to get you out of the way. And careful, in front of the Fluffsters!

Oh my- This is a post?

Uh, hi Fluffsters! How are you doing today? Happy Wednesday!

As you can tell, I’m a bit annoyed at Fluffy for lying to me-

I never actuall-

-but that’s beside the point.

Today, I’m going to show you the first parts of a new project that I’m working on.

Clay Hippocampus (from Greek Mythology)

Hippocampi were a sort of fish-like horse. Think head and body of a horse, except only with arms, and it also has a tail. And gills/fins.

Not dissimilar to this:

Hippocampus/horse-fishy swimming.

Hippocampus-like swimming creature

So when I finally had time (and resources) to try to create a polymer clay statuette, I decided to go with this type of creature.

First, I built a wire frame. I then wrapped it (and shaped it) with aluminum foil. I put masking tape around that, to make sure that if I needed to remove the clay for some reason, the foil wouldn’t come with the clay…

wire, tinfoil, and masking-tape hippocampus

Framework for Hippocampus. My apologies about sideways-ness…

I then put the base-clay on, and added details.

base coat of clay and details on the Hippocampus: Front

base coat of clay and details on the Hippocampus: Front

base coat of clay and details on the Hippocampus: side view

base coat of clay and details on the Hippocampus: side view. Like the mane?

Finally, I baked it.

Baked Hippocampus statuette

Baked Hippocampus statuette

Later today, I hope to add paint. I’m intending to use a very dark blue, and maybe some gold. I’m thinking about putting a metallic white coat over the entire thing. Thoughts on the metallic?

Happy Wednesday! You’re almost half-way done with the week!

Top 5 Comforting Activities

Note: If this is your first time to TotalFluff, please visit this brief explanation. Thanks!

Hello, Fluffsters! Once again I am ignoring the prompt, but not the theme. Today, I’m going to talk to you about some of my more comforting activities.

Let me guess: Asking people weird and bizarre questions?

That’s more of a fun activity, rather than a comforting activity.

You sure fooled me, with how often you do it!

Oh, right! That does remind me, though: If you could have any superpower, 1) what would it be, and 2) how do you use it to take over the world?

While you’re thinking about that, on to today’s content!

5 most comforting activities.

1) Napping.

Wait, what? That’s not an activity!

Sure it is! You’re alive when you nap. And when you’re alive, you’re doing lots of stuff. Like breathing. And possibly dreaming. And dreaming is an activity. So napping is an activity. QED.

Moving on.

2) Crocheting. I’ve already told you that I like to crochet. I still need to figure out how to upload the pattern, and possible totally finish the critter, too… Hmm. Anywho, there’s something soothing, fun, and comforting about having the yarn in your hands, and seeing a creation come into existence. It’s really comforting.

3) Playing my flute. Deep breaths, pretty sounds (except for when you’re playing Hindemith…) and the feel of silver in your hands? It doesn’t get much better than this.

4) Reading. Especially old favorites. It’s like visiting an old friend, without needing to leave the comfort of either your house or your library. As I’ve said, I particularly like fantasy. So some of my old fantasy books are just an amazing comfort to me. Especially on soggy days, with a cup of hot chocolate. There are few things that can beat that!

5) Doodling. Not dissimilar to crocheting, there’s something really comforting about seeing something come to life on a page. Of course, I’m not very good at it. So sometimes it’s more distressing than comforting, especially when I have a particular image in mind that I just can’t draw. Actually, it’s sort of the same with writing. I see things clearly, but I can’t express them overly well. But when I can, that’s an amazing feeling. And so comforting!

So, Fluffsters, what about you? Anything in particular you find really comforting?

Five Uses for Feather Boas (Alright, Ten)

Note: If this is your first time here, please visit this brief rundown. Thanks!

Happy Tuesday, folks! I hope your week started off well.

Well, with Irish music like what I found yesterday, how could it not have?

My, aren’t we full of ourselves today?

Oh, you are too?

Anyways, I’m here today to talk to you about one of the most delightfully fluffy fashion accessories on the face of the earth:

The Feather Boa

A Feather Boa? Snakes on your world have feathers?

Oh. No. Not that type of boa. No, Feather boas are a fashion accessory! They look a bit like this:

An Illustration of a fuzzy furry feather boa

Purple Fluff, in Accessory Form!

How GHASTLY!

Uh, what?

So. Flippin. Fuzzy. What do you even do with it?

Ah, how convenient! That leads me to the topic of:

Top Five Things to do with a Feather Boa

1) Wear it around your neck. It’s sort of like a big long feathery scarf.

That… would clash with everything. And it would get itchy.

Hush, Fluffy! Will you let me finish? Please?

Ok, ok, sorry. Finish your list…

Thank you. So as I was saying, if you wear it around your neck, it’s like a really long feather scarf. And really warm! After all, that fluff traps a lot of heat. It’s great for cold winter days.

2) Cut it to an appropriate length, and use it as a headband. Like with the scarf, it will keep your head warm. And be quite the daring look!

3) Give it to a child for dress-up. It adds instant class to any child’s wardrobe, and will let her have a lot of fun. The boas come in all sorts of colors! Hot Pink? Instant princess! Black? You’re princess Batman! Lime Green? Celebrity. And there are so many more!

4) Give to a child as a toy. And now the child can use it with her stuffed puppy as a leash! And that leash has such class.

5) Decorating. I haven’t actually tried this, but I imagine Red and Green Feather Boas can so easily be used to add festive cheer. Put them on the walls, around the windowsill, or anywhere where you’d normally use tinsel. This would provide a softer look. Let me know if that works? I imagine you can use pastel colors for a spring look. And so many more!

Well, there you go! Happy Tuesday!


I think this is where my main purpose comes into play… That was WAY to fluffy to be healthy. So, here we go:

Top 5 Things Fluffy Would Like to See Feather Boas Used For

1) fire-starters. Assuming they’re not made of non-flammable or toxic material, all that fuzz looks like it would start a fire amazingly. At the very least, it would get rid of the boa.

2) Fluffifier Decoys. Wanting to know who in the room is way too obsessed with fluff and fuzz? Pull out the feather boa. Toss it in some random direction. Watch and see how many people in the room go after it. Congratulations, you’ve now found all the Fluffifiers in the room!

3) Cleaning rag. Hopefully, by the time you’ve used it to wash enough greasy dishes, it will no longer be so… fluffy. At the very least, it will probably be a lot grungier, and therefore slightly less obnoxious.

4) A slingshot. And if you use sharp enough rocks or other projectiles, the fuzz will start to wear off. No more Feather Boa! Yay!

5) A rope Ladder. To a tree-house. Eventually, all that will be left is the base. And who knows, it might even attract more birds! And once again, you achieve the purpose of “no more feather boa.” And besides, what tree-house doesn’t need a snake-like creature hanging down from it?

And with that, readers, happy Tuesday!

What else could be fluffier?

Hello, everyone!

So, a group I know about is collecting crocheted baby clothes to give away. And so do you know what that means? I HAD A LEGITIMATE EXCUSE TO BUY BABY YARN!! and USE IT!!

What, buying inspiration for your website’s color scheme wasn’t enough?

Please. I’ve already designed the color scheme. How can I be buying the yarn for inspiration?

Don’t look at me. You’re the nefarious one who’s occasionally mentioned the equivalent of time-travel on other pages.

Just to clarify… You’re saying that I’m smart enough to have figured out how to go back in time, to change the color scheme, to reflect this post? I’m honored!

But… wait. That doesn’t even work; I couldn’t find yellow yarn, so the yarn doesn’t actually match perfectly! Oh, dear! What’s the point of being a time-traveler if I lose all my ability to color coordinate?

You call this website “color coordinated”?

Well, I try. And seriously, here are the hats:

Fluffy Baby Hats

FLUFFEH!

See? They hardly map to the website colors! They’re totally missing yellow. And they’re not gradiented at all. They clearly didn’t inspire the website colors…

Although, now that I think about it, the website’s colors might have impacted which yarns I bought… Huh.

You seriously bought yarn to coordinate with your website?

I think I’m not going to actually answer that one…

Anywho, happy Saturday, everyone! I hope you all have a wonderful day.